The instructions on this page are to be used when setting up an Outlook 2010 email account to retrieve email from Reveille’s servers.
Follow the slides below working your way left to right.
Click on each numbered vertical bar to view slides below
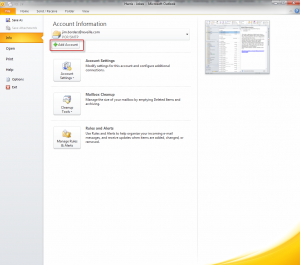
- Start To Add Account
 Click image for larger view in separate browser tab Click image for larger view in separate browser tab |
Add Account
To start adding an account under Outlook 2010:
- Select the "File" tab in the top menu
- Select the "Info" sub-tab from the left side menu if not selected already
- Click the "Add Account" button
|
- Manually Configure
 Click image for larger view in separate browser tab Click image for larger view in separate browser tab |
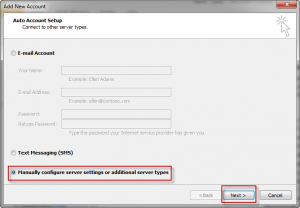
Manually Configure
We're going to bypass the wizard setup (which is only for very simple setups) and choose to manually configure our new email account:
- Select the radio button "Manually configure server settings or additional server types"
- Press "Next >"
|
- Choose Service
 Click image for larger view in separate browser tab Click image for larger view in separate browser tab |
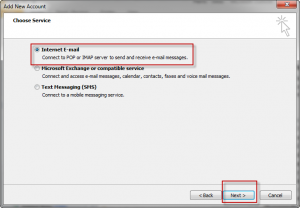
Choose Service
Next we select what kind of account we're setting up:
- Select the radio button "Internet E-mail"
- Press "Next >"
|
- Mail Settings
 Click image for larger view in separate browser tab Click image for larger view in separate browser tab |
Mail Settings
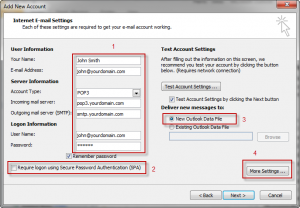
This is the page where you have to pay attention, and be particularly careful with your spelling. Use the graphic at left as your guide:
- Enter "Your Name"
- Enter "E-mail Address"
- Make sure "POP3" is selected in the "Account Type" dropdown menu
|
- For "Incoming mail server" substitute "yourdomain" with your actual domain:
- If your domain is acme.com then you'll enter "pop3.acme.com"
- If your domain is foofoomagoo.net then you'll enter "pop3.foofoomagoo.net"
- if your domain is forhesajollygoodfellow.org then you'll enter "pop3.forhesajollygoodfellow.org"
- For "Outgoing mail server (SMTP)" we're going to follow the same rules for the incoming server, except we're going to be prefixing our domain name with "smtp":
- If your domain is acme.com then you'll enter "smtp.acme.com"
- If your domain is foofoomagoo.net then you'll enter "smtp.foofoomagoo.net"
- If your domain is forhesajollygoodfellow.org then you'll enter "smtp.forhesajollygoodfellow.org"
- For "User Name" enter your full email address, not just the part before the at sign (@).
- Enter your "Password". Pay attention to upper and lower case - it makes a difference. Type slowly and deliberately for this field since it is obscured by asterisks. This is the field on which most people make a mistake.
- Make sure "Require logon using Secure Password Authentication (SPA) is NOT checked.
- Make sure "New Outlook Data File is Selected
- Click the "More Settings..." button - we are NOT going to be pressing "Next" quite yet.
|
- Outgoing Server
 Click image for larger view in separate browser tab Click image for larger view in separate browser tab |
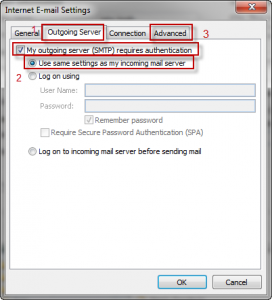
Outgoing Server
On this dialog box:
- Select the "Outgoing Server" tab.
- "My outgoing server (SMTP) requires authentication" is Checked.
- "Use same settings as my incoming mail server" is Selected.
- Then select the "Advanced" tab - we are NOT going to press OK quite yet.
|
- Advanced Settings
 Click image for larger view in separate browser tab Click image for larger view in separate browser tab |
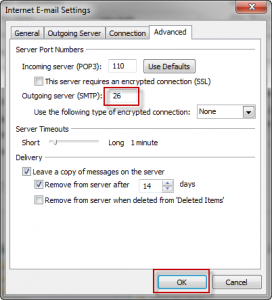
Advanced Settings
The only field on this page that needs changing is the "Outgoing server (SMTP):".
- Change it from the default of 25 to a value of 26
- Press the "Ok" button to take you back to the "Add New Account" dialog with all of your email settings.
|
- Back To Mail Settings
 Click image for larger view in separate browser tab Click image for larger view in separate browser tab |
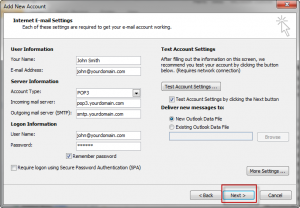
Mail Settings
Now that we're done with the "More Settings..." dialog, we're back at the "Add New Account" dialog.
- Press "Next >"
|
- Test Account Settings
 Click image for larger view in separate browser tab Click image for larger view in separate browser tab |
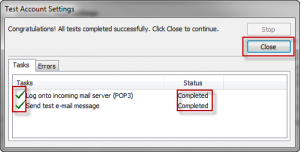
Test Account Settings
After pressing "Next >" on the "Add New Account" dialog, you should be put into the "Test Account Settings" dialog box:
- Make sure you have 2 green check marks at the left.
- Make sure the "Status" is "Completed" for both.
|
If your dialog does look like the one above:
- Press the "Close" button. - this will take you to the "Add Account" dialog.
- Press the "Finish" button. - You're done and your account is setup.
If your dialog does not look like the one above:
- Press the "Close" button. - this will take you back to the "Add New Account" dialog where you can verify or re-enter your values and try again.
|


